Tie dye is a creative technique producing unique‚ colorful designs on fabric. Popular for its versatility‚ it’s a fun‚ easy-to-master craft for all skill levels.
What is Tie Dye?
Tie dye is a resist-dyeing technique that creates vibrant‚ unique patterns on fabric by folding‚ twisting‚ or pleating it before applying dye. This method restricts dye penetration in certain areas‚ resulting in distinctive designs. Popular for its DIY appeal‚ tie dye allows individuals to craft custom textiles with minimal equipment. Suitable for various fabrics‚ especially natural fibers like cotton‚ it’s a creative way to transform clothing and home decor. The process is both artistic and accessible‚ making it a favorite for crafters of all skill levels. Its versatility has made it a timeless trend in fashion and homemade projects.
History and Popularity of Tie Dye
Tie dye has ancient roots‚ with techniques like Shibori in Japan and Bandhani in India dating back centuries. It gained global popularity in the 1960s and 1970s as a symbol of counterculture and creativity. The method was embraced for its unique‚ handmade results and association with free-spirited movements. Today‚ tie dye remains a beloved craft‚ with modern adaptations making it accessible to everyone. Its resurgence in fashion and DIY projects highlights its timeless appeal‚ allowing individuals to create personalized designs with ease. This versatility ensures tie dye remains a popular and enduring art form across generations.
Basic Tie Dye Techniques
Tie dye involves folding‚ twisting‚ or binding fabric to create resistance areas where dye cannot penetrate evenly. Basic methods include folding into spirals‚ accordion pleats‚ or bullseye patterns. After securing with rubber bands‚ dye is applied using squeeze bottles or soaking. Dye solution is mixed according to instructions‚ often requiring soda ash for cotton fabrics. Once applied‚ the fabric is left to set for 6-8 hours before rinsing. Simple techniques like these allow for endless creativity and experimentation‚ making tie dye a fun and accessible craft for all skill levels.
Materials Needed for Tie Dye
Materials Needed for Tie Dye include natural fabrics‚ dye solutions‚ rubber bands‚ squeeze bottles‚ gloves‚ and protective gear. These essentials ensure a safe and successful dyeing process.
Fabric Selection
Fabric selection is crucial for successful tie-dye. Natural fibers like cotton‚ linen‚ and rayon work best‚ as they absorb dye effectively. Avoid synthetic fabrics like polyester or nylon‚ as they may not hold the color well. Pre-wash the fabric to remove any finish that might resist dye. Damp fabric is ideal for tie-dye‚ as it allows the dye to spread evenly. Choose light-colored or white fabrics for vibrant results. Ensure the fabric is clean and free of starch or chemicals for optimal dye absorption. Proper fabric selection ensures bold‚ long-lasting colors in your tie-dye project.
Dyes and Chemicals
For tie-dye‚ choose high-quality dyes like Procion MX‚ which are vibrant and colorfast. Follow the instructions on the dye packaging for proper mixing‚ typically involving water. Soda ash is essential as a fixative to help the dye bind to fabric. Natural fibers like cotton absorb dye best. Always wear gloves and goggles when handling chemicals. Mix dyes in well-ventilated areas to avoid inhaling fumes. Ensure the dye solution is prepared correctly for optimal color saturation. Store leftover dyes and chemicals safely. Proper use of dyes and chemicals ensures bright‚ lasting results in your tie-dye projects.
Tools and Accessories
Essential tools for tie-dye include rubber bands for creating folds‚ gloves to protect hands‚ and goggles for safety. Squeeze bottles or applicator tools help apply dye precisely. Buckets or containers are needed for mixing dye solutions. Plastic drop cloths or old sheets protect work surfaces from stains. Measuring cups or spoons ensure accurate dye mixing. Optional tools like foam brushes can create unique effects. Binder clips or string can also be used for folding techniques. These tools enhance creativity and precision‚ making the tie-dye process easier and more enjoyable. Gather them to achieve the best results for your project.
Safety Gear
Protective gear is crucial for a safe tie-dye experience. Latex or nitrile gloves prevent skin irritation and dye staining. Goggles or safety glasses shield eyes from accidental splashes. A dust mask is recommended when handling powdered dyes to avoid inhalation. Cover work surfaces with plastic drop cloths or old sheets to prevent stains. Avoid wearing favorite clothing‚ as dyes may stubbornly cling. Keep children and pets away from the workspace. Proper ventilation is essential to prevent inhaling fumes; Wash hands thoroughly after handling dyes‚ even with gloves. Change clothes immediately if dye spills occur. Safety gear ensures a fun and hazard-free tie-dye process.
Preparation Steps
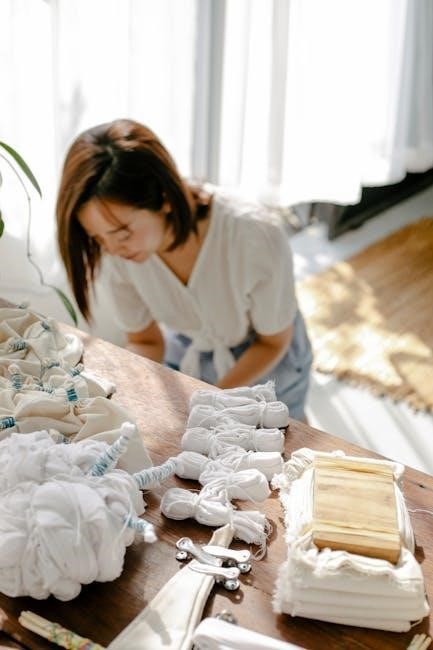
Prewash fabric to remove finishes‚ then soak in warm water or soda ash solution. Choose a folding technique and bind with rubber bands. Let it sit before dyeing.
Washing and Drying the Fabric
Always prewash new fabric to remove finishes that might resist dye. Gently wash in warm water with mild detergent to ensure optimal dye absorption. After dyeing‚ rinse thoroughly with cold water to remove excess dye. Remove rubber bands and wash the fabric separately in hot water to set the colors. Avoid using fabric softeners‚ as they can affect color vibrancy. Once washed‚ air-dry the fabric or tumble dry on a low setting. Proper washing and drying ensure long-lasting‚ vibrant tie-dye results. This step is crucial for maintaining the integrity and color of your design.
Soaking the Fabric
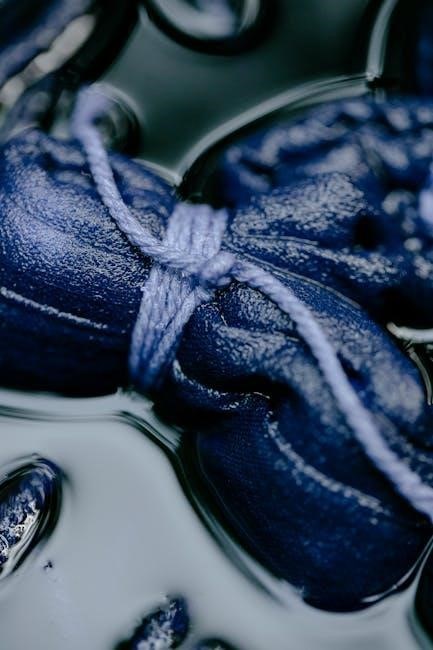
Soaking the fabric is a crucial step before tie-dyeing. Submerge the fabric in a mixture of warm water and soda ash‚ a natural mineral that opens up cotton fibers for better dye absorption. Use 1 cup of soda ash per gallon of water and soak for 15–30 minutes. This step ensures vibrant colors and prevents dye from washing out. After soaking‚ gently squeeze out excess water without wringing the fabric. Keep the fabric damp‚ as dry fabric won’t absorb dye properly. Wearing gloves during this process is recommended to protect skin from soda ash irritation. Proper soaking sets the stage for successful dyeing.
Choosing the Folding Technique
Choosing the right folding technique is essential for achieving desired tie-dye patterns; Popular methods include spiral‚ accordion‚ and bullseye folds. The spiral fold creates a swirly‚ circular design‚ while the accordion fold produces stripes or diagonal patterns. Bullseye folding is ideal for concentric circles or target-like designs. Each technique requires precise folding to ensure the dye penetrates evenly. To start‚ lay the damp fabric flat and identify the center. Twist‚ fold‚ or bind the fabric according to your chosen method‚ securing with rubber bands; Proper folding ensures unique and visually striking results. Detailed instructions for each technique are provided in later sections.

Folding Techniques
Folding techniques create unique tie-dye patterns. Spiral folding produces swirly designs‚ while accordion folding results in stripes or diagonal effects. Bullseye folding creates circular patterns.
Spiral Folding
Spiral folding is a popular tie-dye technique that creates vibrant‚ swirly patterns. Start by laying the fabric flat and identifying the center. Pinch the fabric at the center and twist it outward in a circular motion‚ forming a spiral shape. Secure the folds with rubber bands to maintain the shape. The tighter the folds‚ the more defined the pattern will be. For a classic spiral‚ ensure the fabric is damp before folding‚ as this helps the dye penetrate evenly. Experiment with varying sizes and tightness to achieve unique designs. This method is perfect for creating eye-catching‚ one-of-a-kind pieces.
Accordion Folding
Accordion folding creates bold‚ striped patterns in tie-dye. To achieve this‚ fold the fabric into uniform pleats‚ either vertically‚ horizontally‚ or diagonally. Lay the fabric flat and fold it back and forth like an accordion‚ ensuring even spacing between each pleat. Secure the folds with rubber bands to hold the shape. The tighter the pleats‚ the sharper the stripes will appear. For a modern twist‚ experiment with varying pleat sizes or angles. This technique works well for creating clean‚ geometric designs. After folding‚ apply dye evenly to both sides‚ allowing the colors to blend between the folds for a dynamic effect.
Bullseye Folding
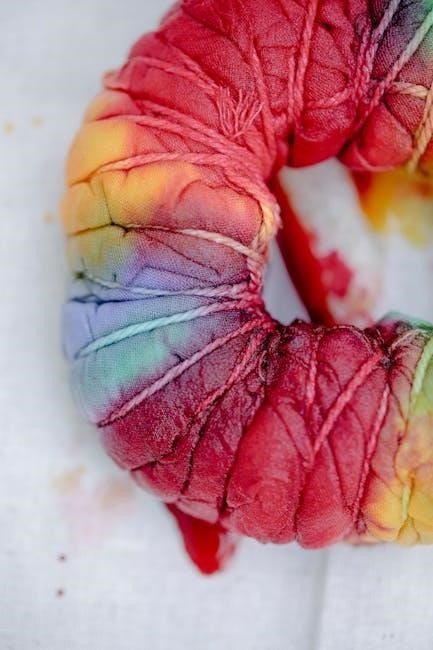
Bullseye folding creates a striking concentric circle pattern. Start by pinching the fabric at the center and twisting it into a spiral shape. Fold the fabric outward in layers‚ forming rings around the center point. Secure each layer with rubber bands to maintain the structure. For a clear bullseye effect‚ ensure the folds are tight and evenly spaced. This technique works well for creating bold‚ symmetrical designs. After folding‚ apply dye to each section‚ allowing colors to blend slightly between the rings. Experiment with multiple colors for a vibrant‚ multi-toned bullseye effect that adds visual interest to your tie-dye project.
Dye Application
Apply dye to the folded fabric using squeeze bottles or pouring methods. Target specific areas for vibrant‚ multi-toned effects; Ensure even coverage for desired pattern outcomes.
Mixing the Dye
Combine 2 teaspoons of powdered dye with 8 oz of hot water to create the dye solution. For lighter shades‚ add more water to achieve the desired color intensity. Use a squeeze bottle or cup to apply the dye evenly to the folded fabric. Ensure the dye is fully dissolved for vibrant results. Always follow the instructions on the dye packet for specific ratios and preparation methods; Wearing gloves and protective eyewear is recommended when handling dye chemicals. Proper mixing ensures consistent color distribution and optimal pattern outcomes in your tie-dye project.
Applying the Dye
Apply the dye using squeeze bottles or cups‚ focusing on the folded sections of the fabric. Work on damp fabric for better dye absorption and vibrant results. For multi-color effects‚ layer the dyes carefully to avoid mixing. Cover your work surface with plastic to prevent stains. Wear gloves and protective eyewear to ensure safety. Use a foam brush to gently spread the dye for softer gradients or ombre effects. Allow the dye to set for 6-8 hours or overnight for optimal color retention. Avoid cross-contamination between colors by applying one shade at a time. This step is crucial for achieving distinct‚ intricate patterns in your tie-dye design.
Setting the Dye
After applying the dye‚ place the fabric in a plastic bag to keep it damp and allow the dye to set. Let it sit for 6-8 hours or overnight for vibrant colors. Avoid direct sunlight during this time‚ as it can fade the dyes prematurely. Do not rinse the fabric until the setting time is complete. Once set‚ remove the rubber bands and rinse thoroughly with cold water to remove excess dye. This step ensures the colors bind properly to the fabric‚ resulting in long-lasting‚ vibrant designs. Proper setting is crucial for achieving the best results in your tie-dye project.
Care Instructions
To maintain vibrant colors‚ wash tie-dye fabrics in cold water with mild detergent. Avoid bleach or harsh chemicals. Line dry or tumble dry on low heat. Iron inside out on low settings to prevent fading. Proper care ensures the longevity of your unique tie-dye designs.
Rinsing and Washing
After setting the dye‚ rinse the fabric gently under cold running water to remove excess dye. Use mild detergent and cold water for the first wash to prevent color fading. Avoid using bleach or harsh chemicals‚ as they can damage the fabric or bleed the colors. Wash tie-dye items separately from other clothes to avoid staining. Gently agitate the water by hand or use a delicate cycle on your washing machine. Do not soak the fabric for extended periods‚ as this may weaken the dye bond. Allow the fabric to air dry or tumble dry on a low setting to maintain vibrant colors.
Drying the Fabric
Allow the fabric to air dry completely after washing‚ either by laying it flat or hanging it in a shaded area. Avoid direct sunlight‚ as it may cause colors to fade. For machine drying‚ use a low heat setting and remove the fabric as soon as the cycle ends to prevent wrinkling. If air drying‚ ensure the fabric is spread out to maintain its shape. Do not dry tie-dye fabrics in high heat‚ as this can damage the material or cause colors to bleed. Proper drying ensures the vibrancy and longevity of your tie-dye design.
Ironing and Storage
Iron your tie-dye fabric inside out on a low heat setting to protect the colors from fading. Avoid using steam‚ as it may damage the dye. For storage‚ keep the fabric in a cool‚ dry place away from direct sunlight‚ which can cause colors to fade. Fold the fabric gently or hang it to maintain its shape. If storing for an extended period‚ consider placing it in a breathable cloth bag to preserve freshness. Proper care ensures the tie-dye design remains vibrant and intact for years to come.

Troubleshooting Common Issues
Common tie-dye issues include uneven color distribution‚ fading‚ and stains. Ensure proper folding‚ use high-quality dyes‚ and rinse thoroughly to avoid these problems and achieve vibrant results.
Uneven Color Distribution
Uneven color distribution is a common issue in tie dye‚ often caused by improper folding‚ insufficient dye saturation‚ or inadequate soaking. To fix this‚ ensure fabric is folded tightly and evenly‚ allowing dye to penetrate uniformly. Use sufficient dye quantity and soak the fabric thoroughly before applying colors. Applying dye unevenly or letting it dry too quickly can also lead to inconsistent results. For better outcomes‚ maintain consistent pressure while binding and ensure all areas are exposed to the dye solution equally. Following these steps will help achieve more balanced and vibrant tie-dye patterns.
Fading Colors
Fading colors in tie-dye projects can occur due to improper washing or excessive sun exposure. To prevent this‚ wash tie-dye fabrics in cold water using a mild detergent. Avoid soaking dyed fabrics for extended periods‚ as this can weaken color intensity. For prolonged color retention‚ consider using color-protecting laundry products. Additionally‚ air-drying fabrics away from direct sunlight helps preserve vibrant hues. To further minimize fading‚ pre-wash fabrics before dyeing to remove impurities and ensure better color adhesion. Following these care tips will help maintain the richness and longevity of your tie-dye designs.
Stain Removal
Removing stains from tie-dye fabrics requires gentle care to preserve the design. For dye stains on surfaces‚ immediately blot with a damp cloth and apply a mixture of equal parts white vinegar and water. For fabric stains‚ treat them before washing by applying a small amount of laundry detergent directly to the stain. Gently rub and rinse with cold water. Avoid harsh chemicals‚ as they may damage the dye or fabric. For tougher stains‚ soak the fabric in cold water with a mild detergent before washing. Always test a small area first to ensure the solution doesn’t affect the colors.
Advanced Tie Dye Patterns
Explore intricate designs with multi-color layering and ombre effects. Combine folding techniques like spirals and bullseyes for unique‚ complex patterns that elevate your tie-dye creations to the next level.
Multi-Color Techniques
Multi-color tie dye involves layering different dyes to create vibrant‚ intricate designs. Start by folding the fabric into your desired pattern‚ then apply each color separately using squeeze bottles or brushes. For ombre effects‚ gradate colors by blending one shade into another. To achieve crisp lines‚ let each color set before adding the next. Experiment with contrasting hues for bold results or pastels for a softer look. Proper binding with rubber bands ensures colors stay contained. After dyeing‚ let the fabric set for 6-8 hours before rinsing. This method allows for endless creativity and unique‚ multi-dimensional patterns.
Layering Methods
Layering methods in tie dye allow for intricate‚ multi-dimensional designs. Start by applying the first layer of dye‚ then let it set before adding subsequent layers. Use squeeze bottles or brushes to precision-apply colors‚ ensuring each layer doesn’t bleed into the next. This technique creates depth and uniqueness in patterns. For bold contrasts‚ apply darker shades first‚ followed by lighter ones. Experiment with overlapping colors to achieve vibrant‚ one-of-a-kind effects. Proper binding and waiting times between layers are key to maintaining crisp‚ defined lines. This method is ideal for creating complex‚ visually striking tie dye designs with professional results;
Combining Folding Techniques
Combining folding techniques enhances tie dye creativity‚ offering unique patterns. Spiral and accordion folds can be layered for intricate designs. Try pairing a bullseye fold with a vortex technique for striking contrasts. Secure fabric tightly with rubber bands to ensure distinct color separation. Experiment with folding sequences‚ as each step influences the final design. For multi-color effects‚ apply dye to each section separately. This method allows for endless variations‚ making each piece truly original. Proper binding and even dye application are crucial for achieving vibrant‚ layered patterns. Combining techniques expands artistic possibilities‚ resulting in dynamic and visually captivating tie dye designs.

Printable Tie Dye Instructions
Download step-by-step guides for tie dye projects‚ including supply lists‚ folding techniques‚ and dye application tips. Perfect for beginners and experienced crafters seeking clear‚ actionable instructions.
Step-by-Step Guide
Start by gathering supplies‚ including fabric‚ dyes‚ rubber bands‚ and gloves. Pre-wash the fabric to remove finishes. Soak the fabric in water mixed with soda ash to enhance dye absorption. Choose a folding technique‚ such as spiral‚ accordion‚ or bullseye‚ and secure with rubber bands. Mix the dye according to instructions‚ then apply evenly to the folded fabric. Let it sit for 6–8 hours to allow the dye to set. Rinse gently under cold water to remove excess dye‚ then wash separately in hot water. Dry naturally or iron on low heat. Repeat for multi-color designs and explore layering methods for unique patterns.
Visual Aids and Diagrams
Visual aids and diagrams are essential for mastering tie-dye techniques. Step-by-step guides with images or videos demonstrate folding methods like spirals‚ accordion folds‚ or bullseye patterns. Diagrams show how to bind fabric with rubber bands and apply dye evenly. Infographics highlight materials needed and the dyeing process. Photos of finished designs inspire creativity and help troubleshoot common mistakes. Printable charts and tutorials provide clear instructions for mixing dyes and setting colors. These resources make complex techniques accessible‚ ensuring a successful tie-dye project for crafters of all skill levels. They also offer inspiration for experimenting with unique patterns and color combinations.
Common Mistakes to Avoid
When tie-dyeing‚ avoid overbinding fabric‚ as it can prevent dye from penetrating evenly. Using too much dye may lead to overly saturated‚ dark colors. Ensure fabric is damp but not soaking wet‚ as excess moisture can dilute dye. Avoid applying dye too quickly‚ as it may spread unevenly. Not waiting long enough for the dye to set can result in faded patterns. Rubbing the fabric during washing can damage the design. Forgetting to wear gloves can stain skin. Skipping pre-washing fabric may cause uneven dye absorption. By avoiding these mistakes‚ you can achieve vibrant‚ professional-looking tie-dye results every time.
Safety Tips
Always wear gloves and goggles to protect skin and eyes from dye. Cover work surfaces with plastic or newspaper to prevent stains. Follow dye instructions carefully.
Working with Dyes
When working with dyes‚ always follow the instructions on the packaging for proper mixing ratios and safety precautions. Use gloves to prevent skin staining and goggles for eye protection. Natural fibers like cotton and linen work best for tie dye. Prepare the dye solution in a well-ventilated area‚ using hot water for vibrant colors. Apply the dye evenly‚ using squeeze bottles or pouring techniques. Allow the dye to set for 6-8 hours before rinsing. For darker colors‚ extend the setting time. Avoid mixing dyes unnecessarily to prevent unwanted color combinations. Always test the dye on a small fabric sample first.
Protecting Surfaces
Protecting your work surface is essential to avoid permanent stains from tie-dye projects. Cover your workspace with plastic sheets‚ drop cloths‚ or old newspapers. Use garbage bags or waterproof tablecloths for easy cleanup. If working indoors‚ ensure the area is well-ventilated to prevent inhaling dye fumes. Wear protective gloves and old clothing to shield yourself from stains. For spills‚ immediately blot the area with paper towels and clean with soap and water. Consider doing tie-dye outdoors to minimize mess. Always test dye on a small‚ inconspicuous area first to ensure colorfastness and avoid surface damage.
Handling Chemicals
When working with tie-dye chemicals‚ prioritize safety to avoid accidents. Always wear protective gloves and goggles to prevent skin and eye irritation. Ensure good ventilation to avoid inhaling dye fumes. Follow the instructions on dye packets carefully‚ as improper mixing can be hazardous. Soda ash‚ a common fixative‚ should be handled with care to avoid inhaling its powder. Procion MX dye requires precise measurement to achieve desired results. Keep chemicals out of reach of children and pets. Dispose of leftover dye and chemicals responsibly‚ adhering to local regulations. After use‚ rinse tools thoroughly and wash hands with soap and water.
Tie dye is a fun‚ creative craft that offers endless possibilities for self-expression. With simple steps and materials‚ anyone can achieve vibrant‚ unique designs to cherish.
Final Thoughts
Tie dye is a versatile and rewarding craft that allows for endless creativity. Whether you’re creating vibrant patterns or subtle designs‚ the process is both meditative and fulfilling. With simple materials and step-by-step guidance‚ anyone can master tie dye techniques. The joy lies in experimenting with colors and folds to achieve unique results. Remember‚ practice makes perfect‚ so don’t hesitate to try new methods and explore different styles. Tie dye is more than just a trend—it’s a way to express individuality and bring personalized flair to your clothing and home decor. Happy dyeing and enjoy your creative journey!
Encouragement to Experiment
Don’t be afraid to explore and try new techniques—tie dye is all about creativity! Experiment with different folding methods‚ color combinations‚ and patterns to create unique designs. Try spiral‚ accordion‚ or bullseye folds‚ and don’t hesitate to combine them for intricate results. Mix dyes in unexpected ways to achieve vibrant hues or soft ombre effects. Remember‚ tie dye is a forgiving process‚ and “mistakes” often lead to stunning surprises. Whether you’re a beginner or an experienced crafter‚ pushing boundaries and trying new ideas will keep your projects fresh and exciting. Embrace the process and let your imagination shine!
Resources for Further Learning
Explore tie dye further with online tutorials‚ step-by-step guides‚ and video demonstrations. Websites like Pinterest offer inspiration and printable instructions for various techniques. Craft stores often provide workshops or detailed kits with instructions. Additionally‚ DIY blogs and forums share tips‚ tricks‚ and creative ideas to enhance your skills. For visual learners‚ YouTube videos showcase live tie dye processes‚ from folding methods to dye application. Experiment with different resources to discover new patterns and refine your craft. Whether you’re a beginner or an advanced crafter‚ these tools will help you master tie dye and unlock endless creative possibilities.